
It is not easy being a parent during these unprecedented times.
Managing new routines, work from homes , and homeschooling, while quelling your family’s anxieties about the pandemic can be exhausting. To add to it all, you might be feeling extra pressure to constantly keep your child meaningfully engaged at home.
We hear you. And while we might not be able to predict when this will change, we decided to do something to make your time at home a little easier and more enjoyable.
Introducing Co Create with shumee — our new series of DIY activities for play and learning at home!
Each week, we will partner with a mom to bring you a skill-based, fun, and simple activity that you and your child can enjoy together. If your child loves matching games, exploring colors, and playing with you, this week’s activity might be perfect for them!
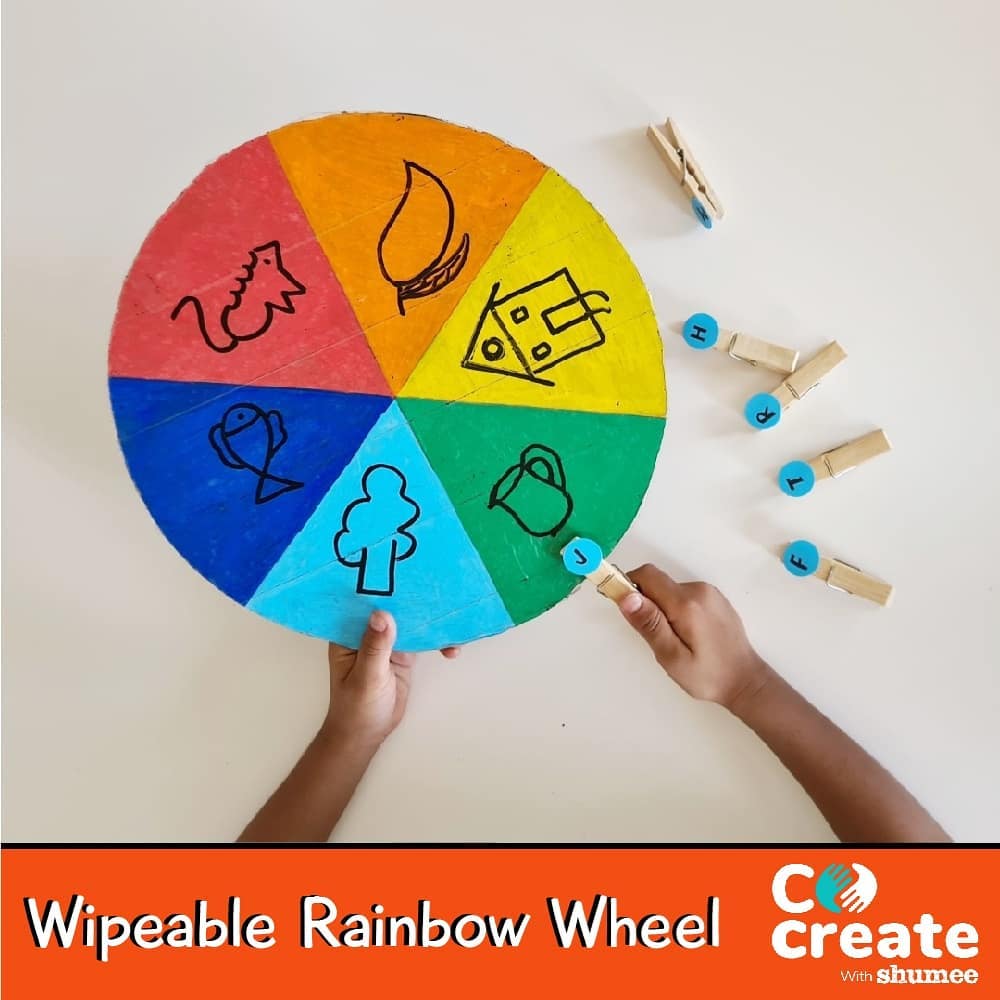
Wipeable Rainbow Wheel

Our first DIY activity is by Aisha Chandarana, a DIY blogger and mom to four-year-old Ninaad. Today, she will be showing us how to create and play with a Wipeable Rainbow Wheel.
A Wipeable Rainbow Wheel is a lovely game where your child has to complete easy counting or identifying tasks based on different drawings you make on the wheel. The benefits of playing with this wheel are:
1. Builds hand-eye coordination
2. Enhances focus & concentration
3. Facilitates learning letters, numbers, and shapes in a fun way
4. Improves fine motor skills
5. Encourages your child to learn early coding
6. Teaches phonics, math, and pre-writing skills like tracing and color coding
Creating the Rainbow Wheel

Age recommendation:
This activity is ideal for children of 3 to 6 years. Your child can play with this multi-purpose wheel in different ways, according to their age and stage of development.
Materials required:
- A piece of aged cardboard
- A roll of thick clear tape
- Paint and paintbrushes
- White board markers
- Clothespins
- Plain stickers or colored paper and glue
- Color dice (additional)
How to create the Wheel:
1. Take the piece of aged cardboard and cut it into a circle.
2. Divide the circle into 6 equal parts and colour it with paint/marker.
3. Cover the colored circle with the broad clear tape to make the surface wipeable.
4. Write the answers (numbers/alphabets) on the plain stickers and paste them on the clothespins. These can be reused for different games.
Playing with the Rainbow Wheel

The aim of the game is to match the correct clothespin with the respective section on the board. You can start by drawing different objects in each section or drawing a different number of objects in each section.
If you’ve drawn a different object in each section, ask your child to match the right alphabet clothespin with the starting alphabet of the object in each section. If you’ve drawn different numbers of objects, ask them to count the objects in each section and match the correct number clothespin accordingly.
To add more of a challenge, you can introduce color dice to the game. Let your child roll the dice. Depending on which color the dice lands on, ask them to solve that particular section of the wheel. Or you could ask them to multiply the answer in a section with the number you roll on a dice. Once they’ve gotten a hang of the game, feel free to get as creative as you want!
We hope you’ve enjoyed this activity. If you would like to share your experience playing with this wheel, tag us at #CoCreatewithshumee. Stay home and stay safe!
Aisha Chandarana creates DIY activities with cardboard and nature elements, providing amazing play experiences for children. You can follow her @toontots on Instagram.